- Solutions
-
-


Solutions
Perfect eCommerce solutions for any business. We provide customized solutions for B2B and B2C businesses across multiple industries.
Learn more
-
-
- Products
-
-
-
Products
Streamline backend operations, improve inventory management, and more with our business management software.
Learn morePLATFORM

-
-
- Services
-
-
-
Services
We go beyond software to provide the customizations, services, and support your business needs.
Learn more
-
-
- Industries
-
-
-
Industries
Business management software tailored to meet the needs of specific industries, including industry-specific regulations.
Learn moreINDUSTRIES
-
-
- Resources
-
-
-
Resources
Learn more about business management software and the latest developments in the industry.
Learn more
-
-

September 25, 2020
An out-of-the box implementation of Sage X3 limits the number of lines in price lists to 100. This can create problems when either manually adding all your products to the price list or attempting to import a large price list with more than 100 lines. Fortunately, users can manually increase the number of lines in price lists up to a maximum number of 32,267.
Our Sage X3 tutorial will easily walk you through the steps needed to increase the number of lines in a Sage X3 Price List. In this example, we will use the Sales Price List, however the same steps can be followed to increase the number of lines on the Purchase Price List as well. The only difference between increasing the number of lines in the Purchase Price List and the Sales Price List is the activity code. Use activity code “SPL” for the Sales Price List and the code “PPL” for the Purchase Price List.
Please note that we highly recommend processing some of these steps, particularly the Dictionary Validation, outside of normal business hours and when other users are not in the system. This will help prevent system slowdowns or data locking/corruption.

How to Increase the Number of Lines in a Price List in Sage X3 ERP
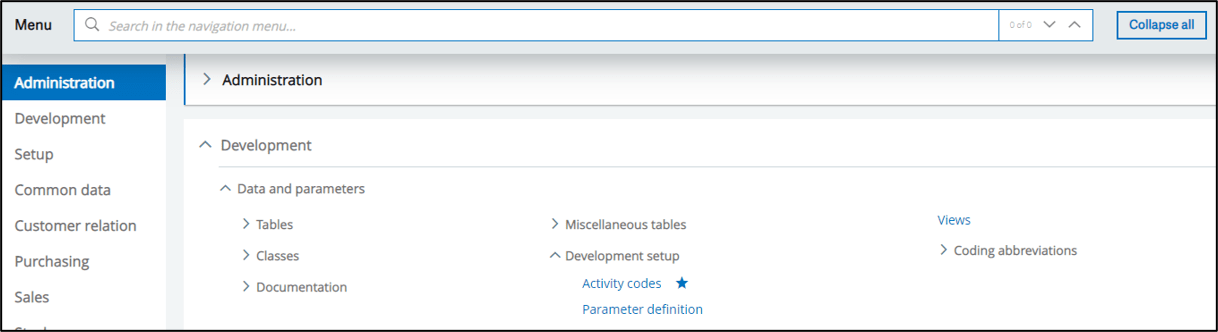
1. Go to the main menu in Sage X3 and select the Development menu from the available options.
2. From the Development menu drop-down, select “Data and Parameters” option.
3. This will open a second dropdown menu. Select the “Development Setup” menu option and the task “Activity Codes.”
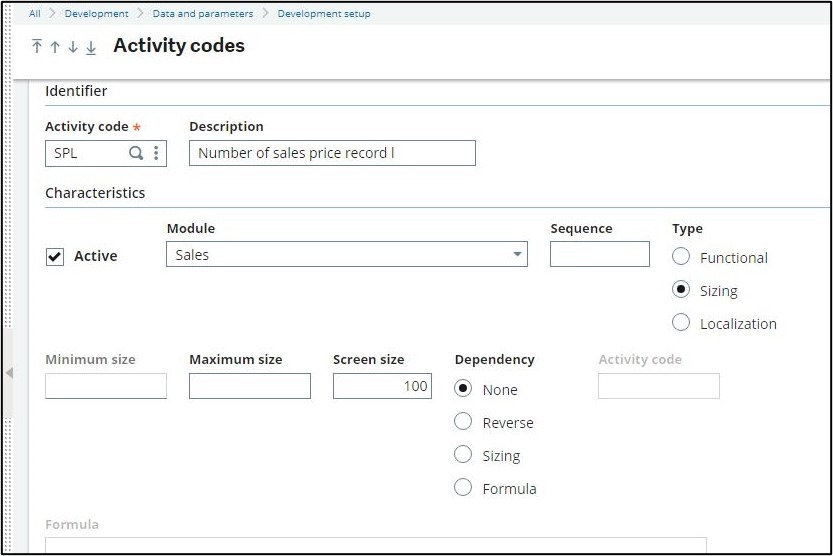
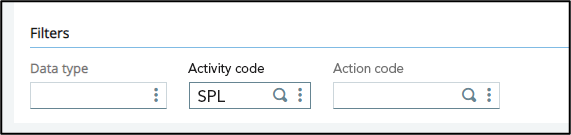
4. Type or select “SPL” in the activity code field.
5. Go to the “Screen Size” field and change the screen size from 100 to any valid number required (maximum is 32,267), and then hit save. (We do not recommend increasing it to anything over 5,000 lines since data will be very slow to load.)
6. Then exit that screen and go back to the Development menu, which is accessible from the main menu.
7. From the Development menu drop-down, select “Utilities” and then select “Dictionary” from the sub-menu.
8. From the Dictionary sub-men, select “Validation” and then select the “Dictionary” task.

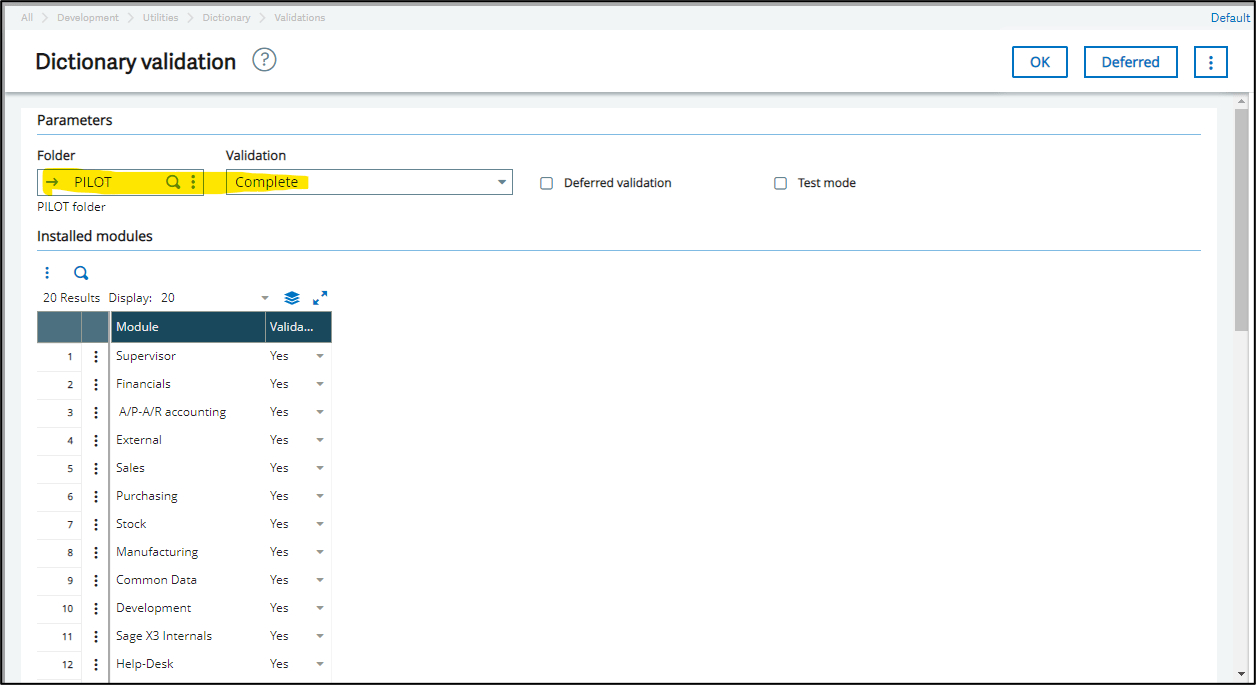
9. Enter or select the appropriate folder name in the “Folder” field.
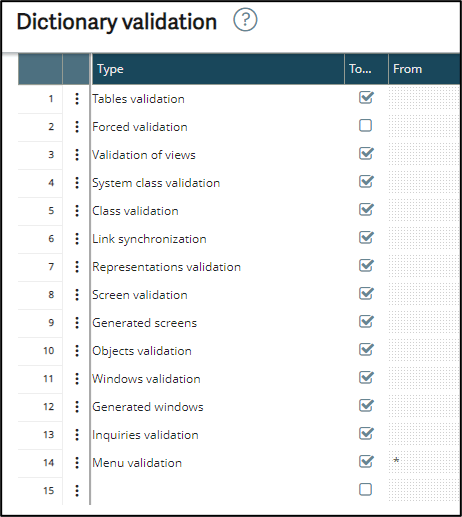
10. You will need to check all the boxes under the “To Process” field. An easy way to do this is to go to the “Validation” field at the top and select “Complete.” This will automatically check the boxes. Then change the value in the “Validation” field back to “Free.”
11. Scroll all the way down to the bottom of the screen and enter “SPL” into the “Activity Code” box at the bottom.
12. Now run a Dictionary Validation by pressing the “OK” button near the top of the screen. Depending on the folder size and data, this process may be time-consuming. (Please note that we highly recommend processing a Dictionary Validation outside of normal business hours and when other users are not in the system to prevent system slowness and data locking/corruption.)
13. Once the Data Validation is complete, the lines will have increased to the number specified – you can return to the Sales Price List task and continue adding lines or continue with your import.
14. Follow the above steps to increase the lines for the Purchase Price list except replace Activity Code SPL with PPL.
Additional Resources
Please click here to see our Sage X3 tutorial on how to create statistical groups, or here to learn more about how Sage X3 could help your business.
About Us
CertiPro is an expert in all things Sage. We offer a full implementation of Sage X3 Distribution, Manufacturing and Financials. We also integrate Sage X3 with company’s Magento eCommerce stores. E-Link, our two-way Sage Magento integration, handles all data connection points for business partner portals and other B2B/B2C eCommerce needs. Click here to schedule a demo or learn more about Sage X3.
Database Warning and Disclaimer
Following the steps laid out in this guide may require knowledge of database engines and application databases (DBs) used by your Sage product (including Microsoft/Transact SQL, Pervasive SQL, or MySQL, etc.). CertiPro is not responsible for assisting people with this guide and cannot be responsible for errors resulting from changes to the database engine or DBs. Before making changes, we recommend that people backup all systems and application DBs that would be required for a full system restoration. We highly recommend you process this on a Pilot or Test folder and ensure it works correctly before processing on a Production folder. Contact us for further assistance.